Smart technique to make placeholder to work in all the browsers

The placeholder attribute specifies a short hint that describes the expected value of an input field, the short hint is displayed in the input field before the user enters a value. The placeholder attribute is supported in Internet Explorer 10, Firefox, Opera, Chrome, and Safari. Its a pain for developers to make it work for browsers which doesn’t support placeholder. We do have lots of plugins, which will enable us to fix this issue, however most of them are complicated solutions.

Well, I have a simple solution to make it work for browsers which does not support placeholder.

1. Please add the latest jquery reference to the page  [I have used jquery.1.11.1 ]

<script src="http://ajax.googleapis.com/ajax/libs/jquery/1.11.1/jquery.min.js"></script>

2. Design the page with placeholder attribute


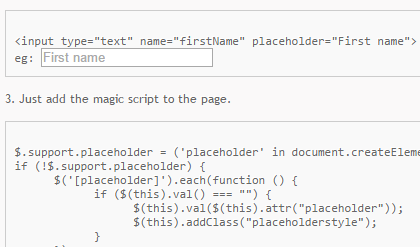
<input type="text" name="firstName" placeholder="First name">
eg: 

3. Just add the magic script to the page.


$.support.placeholder = ('placeholder' in document.createElement('input'));
if (!$.support.placeholder) {
      $('[placeholder]').each(function () {
            if ($(this).val() === "") {
                  $(this).val($(this).attr("placeholder"));
                  $(this).addClass("placeholderstyle");
            }
      });
      $("[placeholder]").focus(function() {
            if ($(this).val() === $(this).attr("placeholder")) {
                  $(this).val("");
                  $(this).removeClass("placeholderstyle");
            }
      }).blur(function() {
            if ($(this).val() === "") {
                  $(this).val($(this).attr("placeholder"));
                  $(this).addClass("placeholderstyle");
            }
      });
}

Basically we are checking the browser supports place holder attribute or not. If it returns false, we inject our piece of code. On load we move the place holder data to value attribute, so when the page loads place holders are already in place. Two basic placeholder events are blur and focus, on focus we remove the value and on blur we put the value back. To look like placeholder we can add simple css styling, in this case I use ‘placeholderstyle’ with color #B1A9B1.

Simple Solution … 🙂

Google Launches Web Designer, A Visual Tool For Building Interactive HTML5 Websites

Google has released a new professional HTML5 design application on Sept 30th 2013 named Google Web Designer for building interactive HTML5 sites and ads. The Google Web Designer enables users to create animated HTML5 creative content, 3D effects, design view and code view. Google calls a professional-quality design tool, is now officially in public beta and available for download for Mac and Windows

google web designer
google web designer


Features:

  • Create Animations: Google Web Designer provide quick mode and advanced mode. In Quick mode, build your animations scene by scene and we’ll take care of the frames in between. In Advanced mode, animate individual elements using layers, easily changing the location of elements within the stack.
  • 3D Effects: Create and manipulate 3D content utilizing an array of tools and the power of CSS3. Rotate objects and even 2D designs along any axis, visualizing 3D transformations and translations as you author.
  • Design view and code view: While a visual tool is helpful, it can never represent your creativity, imagination and vision in full. That’s why you can flip back and forth between Design View and Code View as you work, immediately seeing any changes made to code reflected back in your designs.
  • Illustration tools: Import assets from any other creative suite or use the built-in illustration tools to create vector-style artwork – keeping your designs light. To create new HTML tags in your designs, just draw them in with the Tag tool.
  • Ad workflow: Google Web Designer makes it simple to publish ads through any platform. Choose from DoubleClick Studio or AdMob, or go for the Generic option to push content through any other ad network. No coding required.

Please follow the link to download Google Web Designer.

Smart java script to handle query string using Regex

Handling query strings using java script is quite tough. If we Google it, we find lots of solutions, however most of the solutions are complicated or not generic. Years back I got one solution, but I have no idea who came up with this idea. The piece of code is totally generic and can be reused anywhere.


var uri = window.location.href; // Takes the current page Url
var queryString = {};           // array of querystring
uri.replace(
	new RegExp("([^?=&]+)(=([^&]*))?", "g"),
	function($0, $1, $2, $3) { queryString[$1] = $3; }
);                              //regex logic
// Alerts the firstName value from the query string
alert('First Name: ' + queryString['firstName']);
// Alerts the lastName value from the query string
alert('First Name: ' + queryString['lastName']);
 

Now imagine that the current page URL is
'http://www.geekphilip.com/add.php?firstName=philip&lastName=tiju&email=info@geekphilip.com'
Now by using queryString[ ‘tag Name’ ] you can read the value.
ie. queryString[‘firstName’] returns philip and queryString[‘lastName’] returns tiju.

I really would like to appreciate the guy, who came up with this idea.

Anyway Hats off to you boss.

Visual Image loader using jQuery

There is a excellent jQuery script which creates visual image loading effect, while the image actually loads. When the page is initialized, an animated preloader will take it’s place creating the “image loading” effect. Once the image is ready to be displayed, a script will kick in and image loads with a fade effect.

Step 1. Create a visual image loader image. I prefer www.ajaxLoad.info, once created name it as ‘loader.gif’

Step 2. Create a Div area for the image

  <div id="showloader"
       style="background: transparent url(loader.gif) no-repeat center  center;
              width: 500px;
              height: 500px;
              overflow: hidden;">
  </div>

Step 3. Create an image loading kick-in function.

  function putLoading(imageLink)
  {
     var img = new Image();
     $(img).load(function ()
     {
         $(this).css('display', 'none');
         $(this).hide();
         $('#showloader').removeClass('showloading').append(this);
         $(this).fadeIn();
     }).error(function ()
     {
         // some error message
     }).attr('src', imageLink);
  }

Step 4: Now just call the function putLoading() with Image path.


Full Code:

  <div id="showloader"
       style="background: transparent url(loader.gif) no-repeat center  center;
              width: 500px;
              height: 500px;
              overflow: hidden;">
  </div>
  <script src="js/jquery.js" type="text/javascript"></script>
  <script type="text/javascript">
  function putLoading(imageLink)
  {
    var img = new Image();
    $(img).load(function ()
    {
       $(this).css('display', 'none');
       $(this).hide();
       $('#showloader').removeClass('showloading').append(this);
       $(this).fadeIn();
    }).error(function ()
    {
       // some error message
    }).attr('src', imageLink);
  }
  </script>
  <script type="text/javascript">
     putLoading('http://farm1.static.flickr.com/3167/5796343598_3e94a146cc.jpg');
  </script>

Demo: http://worldofmagicians.com/photogallery/photogallery.php?user=MagicianPhilip