Migrate from SVN to Github Source control

Before migration make sure you have installed Github client, Java development kit. You can download JDK from https://docs.oracle.com/cd/E19182-01/820-7851/inst_cli_jdk_javahome_t/ . Make sure your JAVA_HOME is also set under environment variables

Please follow the step by step guide mentioned below:

  1. Create a new folder and navigate to the folder. eg: C:\svnproject
  2. Now we need to extract the SVN project and history, thereafter clone the project for GitHub
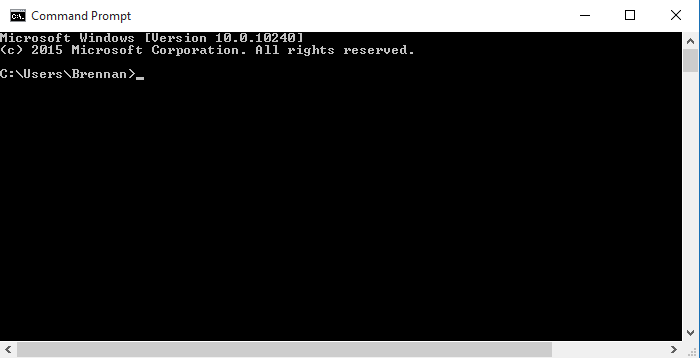
    • Open the command prompt and navigate to C:\svnproject
    • Extract project and history from SVN and clone for GitHub by using the following syntax
      git svn clone <SVN Path>
      eg: git svn clone svn://svndomain/ApplicationPath
    • Once you execute the above command, it will prompt you to enter SVN username and password, if SVN is not already configured in your system.
    • After entering your SVN credentials, it will extract the history from SVN and make a clone for GitHub. This step may take time depending upon the history size.


  3. Add the cloned project to the remote GitHub
    • In the current directory, execute the following command to create a remote link with GitHub
      C:\svnproject>git remote add origin https://github.com/repo-name
  4. Verify the GitHub remote configuration
    • In the current directory, execute the following command to verify the remote link configuration is correct
      C:\svnproject>git remote -v
    • If the configuration is correct, we will get the following output with the remote GitHub link
      origin https://github.com/repo-name (fetch)
      origin https://github.com/repo-name (push)
  5. Push the source to the GitHub repo
    • In the current directory, execute the following command to push the source to GitHub repo, this may take time, based upon the size of the project
      C:\svnproject>git push -u origin master
  6. That’s it, you successfully moved the SVN project with history to GitHub
Migrate from TFS to Github Source control

Before migration make sure you have installed Github client, Java development kit. You can download JDK from https://docs.oracle.com/cd/E19182-01/820-7851/inst_cli_jdk_javahome_t/ . Make sure your JAVA_HOME is also set under environment variables

Please follow the step by step guide mentioned below:

  1. Download GIT-TF from the following URL git-tf.zip
  2. Extract the download file and navigate to the extracted folder. eg: C:\git-tf
  3. Now we need to extract the TFS project and history, thereafter clone the project for GitHub 
    • Open the command prompt and navigate to C:\git-tf
    • Extract project and history from TFS and clone for GitHub by using the following syntax

      git-tf clone <TFS Project Collection> <TFS Project Name> <Output Source> --deep
      eg: git-tf clone 
      http://tfs.comapanyname.com:8080/tfs/DefaultCollection $/Project/ C:\ProjectDirectory --deep
    • Once you execute the above command, it will prompt you to enter TFS username and password. 
    • After entering your TFS credentials, GIT-TF will extract the history from TFS and make a clone for GitHub. This step may take time depending upon the history size. 
  4. Create a new repository in Github
  5. Add the cloned project to the remote GitHub
    • Open the command prompt and navigate output source folder eg: C:\MyEFFramework and execute the following command to create a remote link with GitHub
      C:\ProjectDirectory>git remote add origin https://github.com/reponame
  6. Verify the GitHub remote configuration
    • In the output source folder execute the following command to verify the remote link configuration is correct
      C:\ProjectDirectory>git remote -v
    • If the configuration is correct, we will get the following output with the remote GitHub link
      origin https://github.com/reponame (fetch)
      origin https://github.com/reponame (push)
  7. Push the source to the GitHub repo
    • In the output source folder execute the following command to push the source to GitHub repo, this may take time, based upon the size of the project
      C:\ProjectDirectory>git push -u origin master
  8. That’s it, you successfully moved the TFS project with history to GitHub
Smart technique to make placeholder to work in all the browsers

The placeholder attribute specifies a short hint that describes the expected value of an input field, the short hint is displayed in the input field before the user enters a value. The placeholder attribute is supported in Internet Explorer 10, Firefox, Opera, Chrome, and Safari. Its a pain for developers to make it work for browsers which doesn’t support placeholder. We do have lots of plugins, which will enable us to fix this issue, however most of them are complicated solutions.

Well, I have a simple solution to make it work for browsers which does not support placeholder.

1. Please add the latest jquery reference to the page  [I have used jquery.1.11.1 ]

<script src="http://ajax.googleapis.com/ajax/libs/jquery/1.11.1/jquery.min.js"></script>

2. Design the page with placeholder attribute


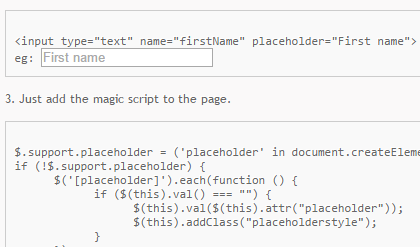
<input type="text" name="firstName" placeholder="First name">
eg: 

3. Just add the magic script to the page.


$.support.placeholder = ('placeholder' in document.createElement('input'));
if (!$.support.placeholder) {
      $('[placeholder]').each(function () {
            if ($(this).val() === "") {
                  $(this).val($(this).attr("placeholder"));
                  $(this).addClass("placeholderstyle");
            }
      });
      $("[placeholder]").focus(function() {
            if ($(this).val() === $(this).attr("placeholder")) {
                  $(this).val("");
                  $(this).removeClass("placeholderstyle");
            }
      }).blur(function() {
            if ($(this).val() === "") {
                  $(this).val($(this).attr("placeholder"));
                  $(this).addClass("placeholderstyle");
            }
      });
}

Basically we are checking the browser supports place holder attribute or not. If it returns false, we inject our piece of code. On load we move the place holder data to value attribute, so when the page loads place holders are already in place. Two basic placeholder events are blur and focus, on focus we remove the value and on blur we put the value back. To look like placeholder we can add simple css styling, in this case I use ‘placeholderstyle’ with color #B1A9B1.

Simple Solution … 🙂

Add Speech Recognition icon to your html textbox

Wouldn’t it be nice if you could offer users where they can just speak instead of typing? Well all you need to do is to add keyword ‘x-webkit-speech’ to the existing textbox.

<input type="text" name="search" />

Try out a live demo – click the microphone icon and speak

To enable language based speech recognition add international language code to lang attribute of text box

<input lang="fr" type="text" name="search" x-webkit-speech/>

You can also set the language code at head section

<meta http-equiv='Content-Language' content='fr'/>

Currently, only Google Chrome supports the HTML speech input API and the microphone icon will be visible. For all other browser, it appears as normal text box.

Smart java script to handle query string using Regex

Handling query strings using java script is quite tough. If we Google it, we find lots of solutions, however most of the solutions are complicated or not generic. Years back I got one solution, but I have no idea who came up with this idea. The piece of code is totally generic and can be reused anywhere.


var uri = window.location.href; // Takes the current page Url
var queryString = {};           // array of querystring
uri.replace(
	new RegExp("([^?=&]+)(=([^&]*))?", "g"),
	function($0, $1, $2, $3) { queryString[$1] = $3; }
);                              //regex logic
// Alerts the firstName value from the query string
alert('First Name: ' + queryString['firstName']);
// Alerts the lastName value from the query string
alert('First Name: ' + queryString['lastName']);
 

Now imagine that the current page URL is
'http://www.geekphilip.com/add.php?firstName=philip&lastName=tiju&email=info@geekphilip.com'
Now by using queryString[ ‘tag Name’ ] you can read the value.
ie. queryString[‘firstName’] returns philip and queryString[‘lastName’] returns tiju.

I really would like to appreciate the guy, who came up with this idea.

Anyway Hats off to you boss.

Clustered Indexes v/s Non-Clustered Indexes

A database index is a data structure that improves the speed of data retrieval operations on a database table at the cost of slower writes and the use of more storage space. Indexes can be created using one or more columns of a database table, providing the basis for both rapid random look ups and efficient access of ordered records.

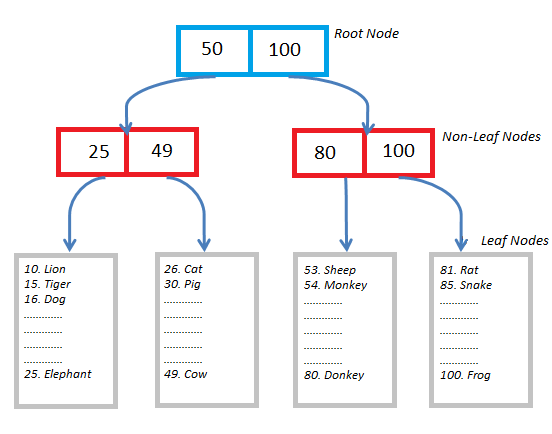
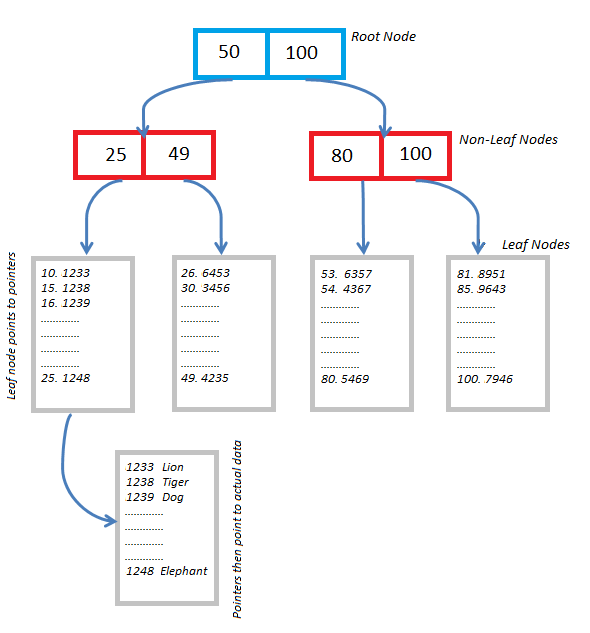
There are basically two types of indexes: Clustered Indexes and Non-Clustered Indexes. Both uses “B-TREE” for searching data. However, storage of physical data differs.

  •  Clustered Indexes:  In clustered index, the non-leaf level points to the actual data.

Clustered Indexes
Clustered Index Architecture

  • Non-Clustered Indexes: In Non-Clustered index the leaf nodes point to pointers, which then point to actual data.

Non-Clustered Indexes
Non-Clustered Index Architecture


Visual Explanation of Access Specifiers in OOPs

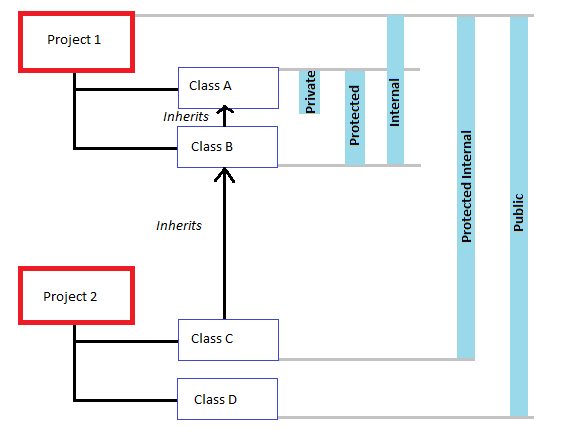
Access specifiers  (or access modifiers) are keywords in object-oriented languages that set the accessibility of classes, methods, and other members. Access modifiers are a specific part of programming language syntax used to facilitate the encapsulation of components.

There are 5 access modifiers.

  1. Private: Accessible only within the class.
  2. Protected: Accessible within the class and its derived classes.
  3. Internal: Accessible anywhere within the current project or assembly.
  4. Protected internal: Accessible with current project and derived classes.
  5. Public: Accessible everywhere.

Access specifier
Access specifier


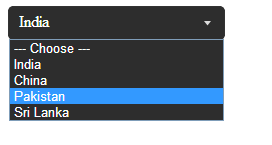
Simple and stylish Drop down using CSS

We have found a simple and decent way to achieve stylish select dropdown using CSS. It works across all browsers, simple to implement and moreover stylish.

1. Create a normal select dropdown as follows:

<select id="ddlCountry">
   <option value=""> --- Choose ---</option>
   <option value="India">India</option>
   <option value="China">China</option>
   <option value="Pakistan">Pakistan</option>
   <option value="Sri Lanka">Sri Lanka</option>
</select>

2. Now wrap the select with a div tag

<div class="ddlWrap">
   <select id="ddlCountry">
      <option value=""> --- Choose ---</option>
      <option value="India">India</option>
      <option value="China">China</option>
      <option value="Pakistan">Pakistan</option>
      <option value="Sri Lanka">Sri Lanka</option>
   </select>
</div>

3. Basically we are going to make the opacity 0 and add a background image for that

.ddlWrap select {
   opacity: 0;
   width: 215px;
   line-height: 1;
   border: 0;
   border-radius: 0;
   background: url("arrow_select.png") no-repeat 100% 0 #2D2D2D; //for IE
   -webkit-appearance: none; //for Google Chrome
   color: #fff;
   height: 32px;
}
.ddlWrap {
   width: 215px;
   overflow: hidden;
   background: url("arrow_select.png") no-repeat 100% 0 #2D2D2D;
   border: solid 1px #333333;
   border-radius: 5px;
   position: relative;
}

4. Now you will find a drop down with an arrow and no text to display, thats because the opacity is 0. Here we need to do a small tweak. We add addional span tag above the select and display the selected content.

<div class="ddlWrap">
   <span> --- Choose ---</span>
   <select id="ddlCountry">
      <option value=""> --- Choose ---</option>
      <option value="India">India</option>
      <option value="China">China</option>
      <option value="Pakistan">Pakistan</option>
      <option value="Sri Lanka">Sri Lanka</option>
   </select>
</div>

5. And update the style for span

.ddlWrap span {
   position: absolute;
   left: 10px;
   top: 5px;
}

6. Now with the help of jQuery we update the span with the selected dropdown text

$('select').click(function () {
   $(this).prev('span').text($(this).find('option:selected').text());
});

That’s it, we have done it. You can trigger a  ready event and update the selected content, if you do not wish to hard code ‘— Choose —‘.

Select drop down using CSS


Click here to download the full source code.


Courtesy: Biswanath Dey (BD)

How To Install Android 4.0 (ICS) On Your Netbook

Android 4.0 (Ice Cream Sandwich) is the latest version of the Android platform for phones, tablets, and more. Android-x86 gives everyone a way to install Android on Intel netbooks. Well I will also explain how to enable dual boot with Ubuntu.

1. Head towards Androidx86 project page and download the Android 4.0 Ice Cream Sandwich. You might find couple of version, select the best one which suit your netbook. Well I prefer ‘android-x86-4.0-RC1-eeepc.iso’. Click on the file to download the iso file

2. Make your Live USB Drive bookable using UNetbootin. Well you can use other boot loaders as well. I prefer UNetbootin, as it supports all platform. Select the .iso file and make the Usb Drive bootable

3. Now Insert the Usb Drive into your Netbook and start using Android 4.0. To get the feel of Android 4.o, you can try out the Live Android-x86. To install, follow the simple steps as prompted. Its recommended to create virtual SD Card.

However you wont be able to make your system dual bootable. Well, you can achieve it. Install Androidx86 to any of your logical drive.

1. Now boot into Ubuntu and open the Terminal and type ‘gksu gedit /etc/grub.d/40_custom’

2. Which will open a text window. At the bottom, add the following line.


menuentry "Android-x86"
{
   set root='(hd0,0)'
   linux /android-4.0-RC1/kernel quiet
   root=/dev/ram0
   androidboot.hardware=eeepc
   acpi_sleep=s3_bios,
   s3_mode SRC=/android-4.0-RC1 SDCARD=/data/sdcard.img
   initrd /android-4.0-RC1/initrd.img
}

Note: * If you didn’t create virtual sdcard, remove the “SDCARD=/data/sdcard.img” part from the 3rd line (make sure you don’t remove anything else!) * The above menu entry uses “eeepc” for androidboot.hardware, but you can replace it with your hardware, depending on the ISO you have downloaded.

3. Find which partion you installed Androidx86. use the following command to find the value ‘sudo fdisk -l’
so if you’ve installed Android x86 on let’s say “sda5”, you’d use “(hd0,5)”. Update the set root value.
4. Now make the file executable and update the GRUB

sudo chmod +x /etc/grub.d/40_custom
sudo update-grub

5. That’s it, there you go. Press shift key before the GRUB loads to select Androidx86
I’m sure its possible to make dual boot with Android and Windows. Do share with me, if you have the answer.

Special Thanks to makeuseof and webupd blogs

Visual Explanation of SQL Joins

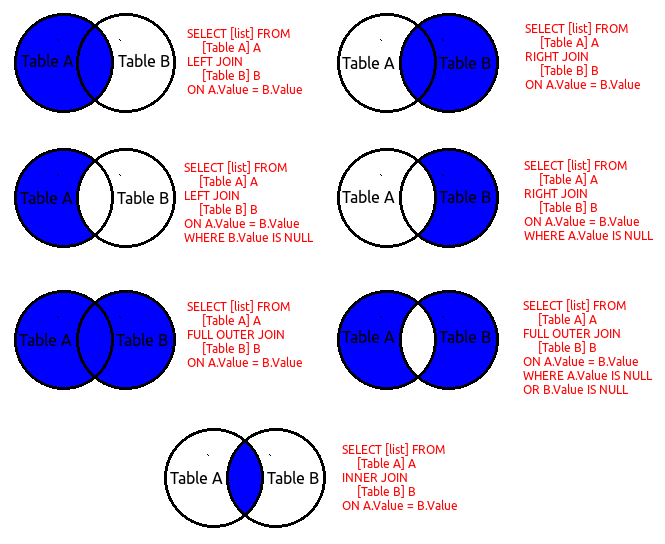
An SQL join clause combines records from two or more tables in a database. ANSI standard SQL specifies four types of JOINs: INNER, OUTER, LEFT, and RIGHT. Since SQL joins appear to be set-based, its easy to explain using Venn diagrams.

LEFT OUTER JOIN: produces a complete set of records from Table A, with the matching records (where available) in Table B. If there is no match, the right side will contain null.

RIGHT OUTER JOIN: produces a complete set of records from Table B, with the matching records (where available) in Table A. If there is no match, the left side will contain null.

FULL OUTER JOIN: produces the set of all records in Table A and Table B, with matching records from both sides where available. If there is no match, the missing side will contain null.

INNER JOIN: produces only the set of records that match in both Table A and Table B.